🚀 Elevate Your 3D Printing Game!
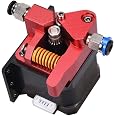
The Bigtreetech Upgrade Dual Gear Extruder is a high-performance 3D printer extruder kit designed for compatibility with popular models like CR-10 and Ender series. Featuring a robust all-metal construction and adjustable spring tension, this extruder ensures reliable filament feeding and improved print quality. Ideal for various filament types, it’s the perfect upgrade for any serious 3D printing enthusiast.


P**R
Easy replacement for the Ender 3 Neo 2
This worked very well as a replacement for my Ender 3 Neo 2 MAX. I did need to print a spacer for the run out sensor and adjust the e-steps which they very helpfully supply the setting and the spacer is easy to find online. I haven't had any clogging or jamming issue and it's pretty quiet. The motor doesn't seem to get any warmer than the OEM and wiring was easy.
J**H
Nice value.
Nice construction, especially for the low price.
D**R
A great hot end for learning how to disassemble your extruder repeatedly
This nozzle just clogs constantly and so badly I have to disassemble the whole extruder to get it working again. I tried upgrading the nozzle to a $60 obxidian nozzle...same thing. This product is a waste of $140 and I can't return it because the box is gone. I exchanged it for a new one and guess what...same issue. On top of the $140 I wasted, I wasted an additional $60 on the new nozzle, $40 on another replacement nozzle trying to see if the nozzle was the problem, $100 on a new all metal extruder gear box and assembly, and no matter how much new upgraded tech I throw at this POS, it simply refuses to work. I run a business and this thing has wasted countless hours with failed prints where the nozzle just prints in mid air once the nozzle becomes hard clogged, rolls of filament, and hours of disassembling and reassembling the extruder to remove the clogs.In short, this company needs to go out of business. The product is awful and I am stuck with metal paperweight because I have no way to return it.
A**.
It's a nice product if you have an indirect feed setup.
Like I said, it's great if you have a non direct feeding setup, unfortunately, I do not. I'll keep it anyways because the price was low enough, it doesn't warrant the effort for a return, and who knows, I may even get to use it on another printer sooner or later. Only complaint I have is that every screw it came with was too long for the Ender 3v2 stepper motor, and I would have had to reuse the old screws to make it work. Ther than that, quality product.
M**N
A great upgrade for my biqu b1 but needs some config changes and spacer
I have 4 BIQU B1s and installed these on 2 of them so far. I plan to do the other 2. These are a really solid upgrade. For the BIQU B1, you need to be aware of a couple things:- The esteps will need to be changed. Mine defaulted to 98 on the old factory extruder. (That resulted in 105mm instead of 100mm extruded by the way). The correct estep value for these is 136 for a BIQU B1. You can set this via gcode using "M92 E136" then issue a save with "M500". You can also use the "save to eeprom" in the BIQU B1 menu to save. If you're not comfortable entering console commands you can use the tuning menu in the BIQU B1 and do the calibration then ignore the measurements and just increase the esteps to 136. After that, make sure you use the "save to eeprom" option.- Some slicers add esteps to the gcode. The ideamaker app that comes with the BIQU B1 does this. So you'll have to edit the printer config and go to advanced and change it from 98 to 136. You can open the gcode files with notepad or such and search for M92 and make sure it's E136 not E98 in that file.- You can alternatively do none of the above and only change the value in the gcode from M92 E98 to M92 E136 but this requires editing each gcode file after saving it.- Finally, the printer's filament sensor will be slightly too low when installing the new extruder. Ideally you need a couple more 1/4" spacers and a couple longer M3 screws. What I did is unscrew the two screws on the filament sensor and move it to the left so that the right screw went into the left hole on the holding bracket. Then I just used the right screw to hold the sensor in place. This moved it to the left almost an inch and the filament can bend a little and it works with no other spacers. A better long term solution will be to get some longer M3 screws and print a couple extra spacers. But it's been working as I set it without any additional parts.
H**H
Works Great but with Some Caveats (Read my Review)
(Bigtreetech Dual-Gear Extruder) I'd give it 3.5 stars if that was an option...3 seems too few but 4 seems to many...and here's why....I bought this to complete the mod of my Longer LK5 Pro from a Bowden Tube to a Direct Drive and replace the extruder. The printer originally came with the black, single-gear extruder with the 'wheel' that is standard on most FDM printers. This does work great and gives you great control over the filament extrusion resulting in much nicer print quality but be aware of a few things:1) Make sure the shaft of your motor is long enough to catch the lock-screw for the gear. Luckily mine was but I read many stories of their motor shaft's being too short. You're going to need at least 20mm of shaft length to secure the gear to the motor shaft.2) I hope you have a Dremel or way to modify the spring that comes with it. The spring they send makes too much pressure and causes the gears to lockup and you get the most sporadic extrusion which will ruin every single print. I've even had prints where it stopped extruding all together because the spring pushed the gears together so hard that it locked and seized up. I took my Dremel and cut off about 3 "rungs" or "loops" of the spring to release some of the tension on the gears and it seems to work much better and doesn't lock-up (for now).3) Make sure to measure, calculate, and change your E-steps value on your printer! They do not mention a word of this in the listing but if you watch a Youtube video, they will tell you about it. The gear sizes from your old extruder and this extruder will likely be different and you'll need to change the E-step value. The E-step value tells your motor how much to turn the shaft to extrude a certain amount of filament. This is a MUST if you are upgrading or changing your extruder or you will never have a successful print.4) There is not a single word of installation instructions but if you pay attention when you are removing your previous extruder, you can reverse the steps and get this one assembled and installed ok. There are also Youtube videos you can watch which walk you through assembling the extruder (as well as how to calculate and change the E-steps value).I'm determined to make this work as it does give much better control over extrusion (especially in a Direct Drive setup). It's been a bit of trial and error and troubleshooting so far but I'm confident I'll get it dialed in eventually.
Trustpilot
1 month ago
3 weeks ago