🏡 Elevate Your Entryway with Style!
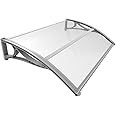
The VOUNOT® Front Door Canopy is a versatile outdoor awning designed to provide shelter from rain, snow, sun, and wind. Measuring 200 x 80 cm and weighing just 4.3 kg, it features durable polycarbonate sheets and a lightweight aluminum frame, ensuring both strength and aesthetic appeal. Ideal for various installations, this canopy combines functionality with modern design, making it a perfect addition to any home.


| Product Dimensions | 80 x 200 x 23 cm; 3.5 kg |
| Part number | 4442185695255 |
| Item display length | 200 centimetres |
| Item display width | 80 centimetres |
| Material type | Polycarbonate Aluminum Acrylonitrile Butadiene Styrene |
| Manufacturer | VOUNOT |
| Item model number | 4442185695255 |
| ASIN | B088ZYR1CW |
T**H
Looks great sprayed anthracite + fitting tips (2hrs)
Needed a cover down the side of the house this was the perfect width and height. Fitting it together is pretty straightforward but weirdly there are no fitting instructions, only assembly instructions. Took me approx 2hrs in total and I am not a prolific DIYer by any means. You need: a half-decent drill, 6mm bit (ideally), 10mm bit, spirit level, marker pen, hammer, ratchet spannerBut here are some tips:1. Spray the light grey brackets an anthracite colour. Then obviously let it dry before assembling. Personally I think they look much better than light grey (black may be fine but possibly too dark).2. Assemble the whole thing first before even thinking of fitting the brackets on to the wall.3. It definitely helps having an extra pair of hands to hold the last bracket as you fit the curved roof section onto it as you’ll need two hands to bend the roof.3. Fitted on a brick wall I used the mortar lines to see if it looked horizontal4. With another person holding it mark all the lower holes with a marker pen5. I found the width of the instructions the exact vertical distance to the upper hole so marked them using a spirit level6. Use fellow buyer Martypants’ advice of WD40 on the screws to prevent any chance kf them threading or getting stuck7. Screw the end fitting to the bolt - if you don’t thee is a chance you will lose it in the wall8. Hammer a nail in the wall first to make an accurate drilling mark9. Use a 6mm masonry bit to drill the hole depths (the lower holes are shorter than the upper holes)10. Then use a 10mm bit to drill out. Try not to go over 10mm (see below)11. Place all the bolts through the bracket holes and position them in (another person helps here)12. Push the bolts in and then gently tap them in13. Screw all the bolts in with a ratchet spanner - the middle one is a pain as you don’t have a huge angle to work with but persevere! The end fitting slowly moves up through the bolt casing inside the wall pushing it outwards thereby ensuring a good firm grip so try not to drill any more than 10mm wide!14. When sprayed anthracite I didn’t put the plastic bolt covers on as the bronze bolt covers looked auite good against the dark grey.15. For a complete finish add a non-removable wall anchor if securing bikes and solar-powered security lights
P**
Easy to install
Quote happy with the product. I was able to set it up alone. No complaints
M**S
Here’s the missing instructions
Ok I bought this without considering the negative reviews. So I thought I would give a measured opinion. The instructions are quite clear that you assemble the complete unit first (mine was 200x80). This is straightforward and you do need another person to assist in this respect. Now what is missing completely in the instructions are the wall drillings. So here are my tips.1. Decide how high you want the canopy.2. Measure the hole spacing between the top and bottom hole on each bracket. Should be 140mm.3. Get somebody to hold the unit upright so you can measure the spacings between each bracket. I found these to be 96cm.4. Using a spirit level and hammer drill, drill 6mm pilot holes in the wall. 6 holes spaced 14cm top and bottom and 96cm spacings across.5. Once your are happy with the exact pilot drill positions use a 10mm masonary drill to open out your pilot holes and drill to a depth to suit the anchors bolts. Note top drillings are deeper than the bottom ones.6. Using another person hold up the frame against the wall and align the holes. MakeSure the bolt thread is engaged fully in the bottom nut and apply wd40 to the thread.7. Starting at one end insert the long and short anchor bolts through the bracket andLightly hammer the bolts in.8. Using a 13mm spanner tighten the bolts. If they keep turning but a flat head screwdriver behind the bracket and lever it outwards. This makes the bottom nut engage and stop spinning and the bolt should then tighten. The wd40 helps this process.9. Repeat forThe other two brackets. Then alight the plastic nut covers and lightly tap them down.The whole process should take about an hour. The materials are robust enough and the canopy is very secure.
M**N
Good product for price
Can be cut to size, even though the instructions don't say it, but if you are happy with a bit of DIY, no problem.
M**.
Let down by poor fittings
Product looks good, and seems good value. I tried fitting today, a job than should have been around 2 hours has still not been completed. The problem is the fittings supplied. The brackets that bolt to the wall have thick plastic where the top bolt passes through and thinner plastic where the lower bolt passes through. Using the fittings supplied the lower bolts fit OK, but because the plastic is thicker where the top bolts pass through the fitting bolts supplied are too short, so you cannot fit the canopy. I have had to spend £9 at Screwfix for longer fittings, which I will have to cut to fit, and I still have to try and remove the old fixing from the brick wall, so I will have to start again tomorrow or next weekend. Over all, very disappointing. It is a real shame because when I eventually get this fitted, I think t will look good and do the job, although I also think you will need to seal the canopy with some clear silicone against the wall because there is no seal.
D**Y
Relatively straightforward to install depending on your DIY experience.
Excellent door canopy with heavy duty metal masonry anchor bolt fixings. 10mm diameter hole 80mm deep/long is required to be drilled to accommodate the fixings.
J**N
Recommended Shelter
Bought for my brother for his garden and he was most pleased with the way it turned out
M**J
Easy to fit for anyone with DIY skils
It was easy to fit. I didn't need the instructions. It was slightly too big for what I needed but ordered it anyway. It was easy to trim down to size as long as you have some tools and a bit of knowledge.Only comes with brick fittings but I guess that's the most common use.Cheap quality as expected for the price but it seems ok and decent value
Trustpilot
1 month ago
2 weeks ago